Stance – Fundamentals Series #2
Each month in 2024, we will be posting a new article in our Fundamentals of Shooting Archery series. These articles are intended to supplement and further explain any instructions given or terminology used by the instructors and assistants.
Stance is important because it forms a foundation for the archery shot.
What do we mean by stance?
The way in which you stand (sit, kneel) in preparation to shoot, is called your stance. You need to be comfortable and have your weight balanced, so that you don’t fall during draw and aim or after the release. Balanced does not necessarily mean that your weight is even between both feet, but that your feet and hips are set and not going to move during the shot sequence. The Stance is the stable platform that the rest of your archery shot process is built on.
What is the Basic or Starting Archery Standing Stance?
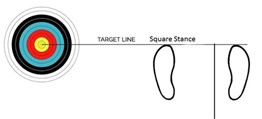
The first & easiest stance to explain is the Square Stance. Stand with your body sideways to the target, feet hip width apart, parallel to each other, with your big toes in line with each other and a line to the center of the target. Your weight is balanced over your feet, don’t lock your knees. Relax archery is fun.

Advantages:
The Square Stance is simple and easy to learn. It is efficient because it matches the natural alignment of the hips, feet, & shoulders. It reduces muscle fatigue and strain during long days of shooting.
Disadvantages:
The Square Stance can be unstable in windy conditions because your base (foot positioning) is narrow on the shooting line.
What are my options if the Square (Basic) Stance is not comfortable for me?
Two optional quick changes to the Square (Basic) Standing Stance are the Open and Closed Stances. Both of these stances will shift your feet & hips out of the Basic Stance, while you keep your torso facing the Target Line (sideways to the target). This will introduce a slight rotation at the hip / abdomen, which may affect aim and follow-through a little. Both can be accounted for, ask your instructor for tips.
What is the Open Stance?
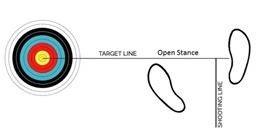
Open Stance refers to opening the front of your body towards the target. There are two easy ways to achieve this, start with the Square Stance and either (A) move your back foot (the one further from the target) a few inches forward or (B) move your front foot (the one closer to the target) backward a few inches. Shift your front foot to a 30 – 45° angle between the shooting line & the target. Allow your hips to follow your feet but rotate your torso to face the Target Line again. Your feet & hips are now ‘open’ towards the target.

A third option to achieve Open Stance is mentioned in Coach Kisik Li’s book, Total Archery: Inside the Archer. Start in the Square Stance on the target line, mark a line across at 30 degrees and move both feet to face this new line. Both feet stay parallel, facing just to the side of the target rather than perpendicular this time. Rotate the torso to face the target line again and we’re in an Open Stance.
During the aim & follow-through steps, you may notice that your torso will try to rotate to match your hip position (open to the target). It is important to maintain the same (sideways to the target) body position throughout the entire shot sequence.
Advantages:
The Open Stance is more stable in windy weather due to the staggered stance of the feet. The slight torso rotation can reduce arching of the low back and can improve shoulder alignment.
Disadvantages:
With the Open Stance, it may take longer to achieve correct vertical torso posture & it is difficult for the archer to identify when they are leaning forward or back. Archers may need to work on upper body strength and flexibility to reduce stress on the low back from the torso rotation and assist with shoulder positioning.
What is the Closed Stance?
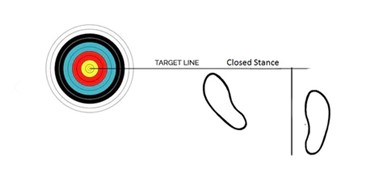
Closed Stance refers to closing the front of your body towards the target. There are two ways to achieve this, start with the Square Stance and either (A) move your front foot (the one closer to the target) a few inches forward or (B) move your back foot (the one further from the target) backward a few inches. Shift your front foot to a 30 – 45° angle between the shooting line & the target. Allow your hips to follow your feet but rotate your torso to face the Target Line again. Your feet & hips are now ‘closed’ towards the target. This stance is harder to perfect with torso alignment, so is not as common.

During the aim & follow-through steps, you may notice that your torso will try to rotate to match your hip position (closed to the target). It is important to maintain the same (sideways to the target) body position throughout the entire shot sequence.
Advantages:
The Closed Stance provides for more structural alignment and stability within the torso which allows the back muscles to be more relaxed during shooting. It can help reduce muscle fatigue over long days of shooting.
Disadvantages:
There’s really only one disadvantage to the Closed Stance. There is a higher possibility of hitting the string on your bowhand forearm during shooting.
What if I can’t stand and shoot for a whole class or event?
If you need an alternative to standing on the shooting line, talk with your instructor. As long as range safety can be maintained, your instructor can help you explore other options like kneeling or sitting at the shooting line.
Kneeling:
For this stance, place your knees on the Target Line with your torso facing the Target Line & sit down on your heels. This is a ‘Square’ Kneeling Stance. Your hips are automatically aligned with your knees while your torso is in the same alignment as the standing stances. Some archers may advance this stance by rising off their heels into a more upright kneel or only kneeling on one leg with the other one bent in front of them.
Advantages:
Kneeling keeps your body lower to the ground and provides more stability in the wind. Archers may find they can hold steadier while aiming.
Disadvantages:
For some people, it is hard to get up and down from a kneeling position and the ground may not be level and easy to kneel on. There is a possibility of the lower bow limb hitting the ground during shooting. Some archers may need to focus more on their upright torso alignment.
Sitting:
Sitting, just like it sounds, implies the use of a chair or bench during class. As in the Square Stance, your feet, hips, & torso will be aligned sideways to the target (facing the Target Line). For purposes of this article series, we assume that students are not sitting on the ground.
Advantages:
Sitting provides much more stability in windy weather and more stability overall during shooting. Archers may find they can hold steadier while aiming.
Disadvantages:
Like kneeling, there is a greater possibility of the lower limb hitting something – the ground or the chair – during shooting. Also, if the chair has arms, the bowstring may pull against the forward one during draw. And watch for any other obstacles on the chair.
Why the emphasis here on maintaining body / torso position? This is an article on foot & hip placement.
Guess what, everything is connected. If your hips are rotated open or closed, there is a tendency for your torso to follow. This will bring your arms and shoulders out of the ‘straight line to the target’ alignment that they are in. This will put your basic aim point off the target center and may encourage unusual practices to bring it back. Such practices could lead to muscle strain or injury or unsafe conditions for yourself or others on the shooting line.
Archers can explore the relationship between feet, hips, and shoulder alignment at home. Using a wall or line on the floor, stand facing the wall / line in a Square Stance, picture a target beside you aligned to the same line. Move your feet and hips into an Open or Closed Stance while keeping your shoulders parallel to the wall / line. You should notice a twist through your torso, this twist must be maintained through the whole shot process. Your instructor can also walk you through this exploration in class, if you want.
The May article (Step #4 – Set) will go further in depth into body position & how it affects each shot.
During the follow-through, strange as it may seem, if you allow your torso to rotate to match your hips, your arrow will follow that motion and miss the target center. More about this will be covered in the November article (Step #10 – Release / Follow Through).
So, when shifting your feet into an Open or Closed Stance, rotate your torso to remain in the basic vertical, sideways to the target position and hold that position until the arrow is in the target.
Are these the only stances to use during shooting?
No, the list of possible stances contains pretty much anything you can think of. For safety, Enso Center instruction focuses on the three (3) standing stances with occasional others at the discretion of the instructors and under controlled conditions.
